Okay, let's talk Salesforce and field dependencies. You know, the thing that makes your dropdown menus act like they actually know each other? It's all about controlled chaos, really.
Let's Get This Party Started!
First, find the object where the magic needs to happen. Is it the Opportunity? Maybe the Account? Go to Setup and find the object in Object Manager. You'll find it, I believe in you!
Then, hunt down those fields! Click on the field where you want to set this dependency. We're looking for that special Field Dependencies section.
Hit that glorious New button. Exciting, right?
Choosing Your Players
Now, for the fun part! Pick your controlling field. This is the boss, the decider, the field that dictates what happens next.
Then, choose your dependent field. This is the follower, the listener, the field that hangs on the controller's every word. It's a dramatic relationship, really.
Click Continue. Don't worry, you're doing great!
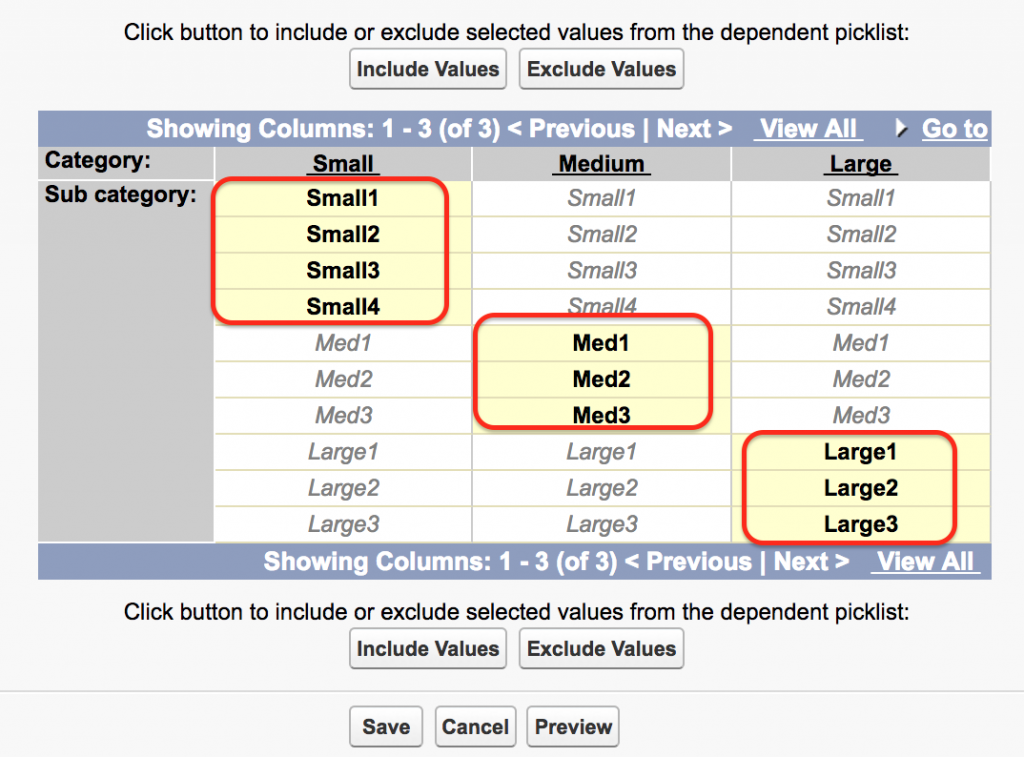
Mapping the Madness
Behold, the grid! Here, we paint our masterpiece. For each value of the controlling field, select which values of the dependent field should be visible. It's like a tiny logic puzzle.
Double-click on the allowed values. They turn blue or whatever color. It's so satisfying.
Don't forget to Save! Seriously, don't forget. We've all been there.
Testing, Testing, 1, 2, 3!
Now, the moment of truth! Create a new record or edit an existing one. Put your dependency to the test.
Change the value of the controlling field. Does the dependent field behave as expected? Fingers crossed!
If not, back to the grid! Don't worry, even Salesforce wizards get it wrong sometimes.
Unpopular Opinion Time!
Okay, here's my unpopular opinion: Field dependencies are never as straightforward as they seem. They always need tweaking. You're not alone!
Someone, somewhere, will find a way to break your carefully crafted dependency. It's inevitable.
Just embrace the chaos and keep iterating. It's all part of the fun (sort of).
A Few Extra Tips
Think carefully about your picklist values. Consistent naming conventions can save you a headache later. Trust me.
Consider using record types to further refine your dependencies. It's like adding another layer of complexity, but in a good way (maybe).
Document your dependencies! Future you (and your colleagues) will thank you. A simple spreadsheet can be a lifesaver.
You Did It! (Probably)
Congratulations! You've (hopefully) successfully deployed a field dependency in Salesforce. Give yourself a pat on the back.
Remember, it's an iterative process. Don't be afraid to experiment and learn from your mistakes.
Now go forth and conquer your Salesforce org! And maybe grab a coffee. You've earned it.